
前一段参与了一个2D机房的项目,但是这种“命题作文”总感觉憋屈,那就回咱这主场再发挥发挥!
第一篇,咱就从机柜下手。
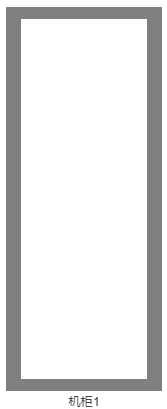
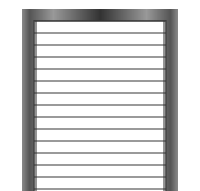
……机柜似乎有点太简单了,因为
机柜就是个大灰框
drawBorder: function(ctx) {
    ctx.fillStyle = 'gray';
    ctx.fillRect(
        this._rackX,
        this._rackY,
        this._rackOuterWidth,
        this._rackOuterHeight);
    ctx.clearRect(
        this._rackX + this._rackGapLR + this._rackInnerGapLR,
        this._rackY + this._rackGapTB + this._rackInnerGapTB,
        this._rackInnerWidth,
        this._rackInnerHeight);
},
当然我不可能到此为止啊,起码给大灰框加点过渡色吧:
this._gradient = this._ctx.createLinearGradient(
    this._rackX,
    this._rackY,
    this._rackX + this._rackOuterWidth,
    this._rackY);
this._gradient.addColorStop(0, '#888888');
this._gradient.addColorStop(0.05, '#555555');
this._gradient.addColorStop(0.2, '#999999');
this._gradient.addColorStop(0.5, '#333333');
this._gradient.addColorStop(0.8, '#999999');
this._gradient.addColorStop(0.95, '#555555');
this._gradient.addColorStop(1, '#888888');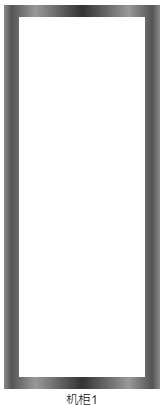
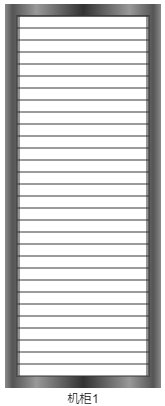
机柜要有U位
drawUspace: function(ctx) {
    ctx.lineWidth = 0.5;
    var uCount = this._uCount;
    while(uCount--) {
        ctx.strokeStyle = this._lineColor;
        ctx.lineWidth = 1;
        ctx.beginPath();
        ctx.moveTo(
            this._rackX + this._rackGapLR,
            this._rackY + this._rackGapTB + this._uHeight * uCount)
        ctx.lineTo(
            this._rackX + this._rackGapLR + this._uWidth,
            this._rackY + this._rackGapTB + this._uHeight * uCount)
        ctx.stroke();
    }
    ctx.lineWidth = this._lineWidth;
    ctx.strokeStyle = this._lineColor;
    ctx.strokeRect(
        this._rackX + this._rackGapLR,
        this._rackY + this._rackGapTB,
        this._uWidth,
        this._uHeight * this._uCount);
},
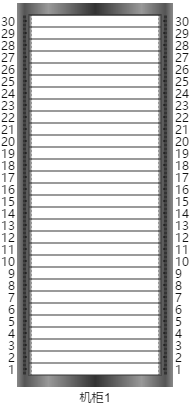
U位要有编号
if(this._element._showUscale) {
    ctx.textAlign = 'right';
    ctx.fillText(
        this._uCount - uCount,
        this._rackX - 2,
        this._rackY + this._rackGapTB + this._uHeight * uCount + this._uHeight / 2);
    ctx.textAlign = 'left';
    ctx.fillText(
        this._uCount - uCount,
        this._rackX + this._rackOuterWidth + 2,
        this._rackY + this._rackGapTB + this._uHeight * uCount + this._uHeight / 2);
}
再加点小细节
drawGarnish: function(ctx) {
    var signCount = this._uCount * 3;
    while(signCount--) {
        ctx.fillStyle = '#333333';
        ctx.fillRect(
            this._rackX + this._rackGapLR - this._uHeight / 2,
            this._rackY + this._rackGapTB + 0.5 + this._uHeight / 3 * signCount,
            this._uHeight / 3 - 1,
            this._uHeight / 3 - 1);
        ctx.fillRect(
            this._rackX + this._rackGapLR + this._uWidth + this._uHeight / 6 + 1,
            this._rackY + this._rackGapTB + 0.5 + this._uHeight / 3 * signCount,
            this._uHeight / 3 - 1,
            this._uHeight / 3 - 1);
        ctx.beginPath();
        ctx.strokeStyle = '#FFFFFF';
        ctx.lineWidth = 1;
        ctx.moveTo(
            this._rackX + this._rackGapLR + 2,
            this._rackY + this._rackGapTB + ((this._uHeight / 3 - 1) / 2 + 0.5) + this._uHeight / 3 * signCount)
        ctx.lineTo(
            this._rackX + this._rackGapLR + this._uWidth - 2,
            this._rackY + this._rackGapTB + ((this._uHeight / 3 - 1) / 2 + 0.5) + this._uHeight / 3 * signCount)
        ctx.stroke();
    }
},
交互式细节
添加了细节虽然逼真了一些,但也会多消耗资源,还显得有点乱,尤其是多个机柜同时展示的时候。
能不能只有我关注的机柜才显示细节,而不关注的就清清爽爽的呢?当然可以,比如我们就把鼠标移入作为“关注”,鼠标移出就“不关注”:
this.getView().addEventListener('mousemove', function(e) {
    var elements = self.getElementsAt(e) && self.getElementsAt(e)._as;
    var currentRack = getCurrentRack();
    if(currentRack) {
        if(currentRack != self._currentRack) {
            self._currentRack && self._currentRack.onMouseLeave(e);
            currentRack.onMouseEnter(e);
            self._currentRack = currentRack;
        }
    } else if (self._currentRack) {
        self._currentRack.onMouseLeave(e);
        self._currentRack = null;
    }
    function getCurrentRack() {
        if(elements && elements.length) {
            for(var i = 0; i < elements.length; i++) {
                elements[i].onMouseMove(e);
                if(elements[i] instanceof RackBin) {
                    return elements[i];
                }
            }
            return null;
        }
        return null;
    }
}, this);
onMouseEnter: function(e) {
this._showUscale = true;
this._showGarnish = true;
this._network.invalidateElementUIs();
},
onMouseLeave: function(e) {
this._showUscale = false;
this._showGarnish = false;
this._network.invalidateElementUIs();
},
交互式U位
如果鼠标在机柜上移动,移到不同的U位就突出显示一下当前U位,那必然是极好的。说干就干:
onMouseMove: function(e) {
    var eLoc = this._network.zoomManager._getLogicalPoint(e);
    this.setFocusUnum(eLoc);
},
setFocusUnum: function(x, y) {
if(x && (x.x || x.y || x.x == 0 || x.y == 0)) {
y = x.y;
x = x.x;
}
this._UI._focusUnum = this.getUnum(x, y);
this._UI.checkRackUAttachment();
},checkAttachments: function() {
RackBinUI.superClass.checkAttachments.call(this);
this.checkRackUAttachment();
},
checkRackUAttachment: function() {
if(this._focusUnum) {
var data = this._rackUdatas[this._focusUnum];
if(data) {
if(this._rackUAttachment) {
if(this._rackUAttachment._id != data.id) {
this._rackUAttachment.setData(data);
this._network.invalidateElementUI(this._element, true);
}
} else {
this._rackUAttachment = new RackUAttachment(this, true, data);
this.addAttachment(this._rackUAttachment);
this._network.invalidateElementUI(this._element, true);
}
}
} else {
if(this._rackUAttachment) {
this.removeAttachment(this._rackUAttachment, true);
this._rackUAttachment = null;
}
}
}
这里的“当前U位”使用了自定义附件的方式,至于为什么用这种方式……大概就是我会的太多了吧^-^
对了,我之前提到过什么来着——
多机柜展示
arrangeRacks: function() {
    var count = this._racks.length;
    if(count) {
        var spacing = this._rackWidth + 40;
        var viewRect = this.getViewRect();
        var startX = viewRect.x + viewRect.width / 2 - this._rackWidth / 2;
        if(count > 1) {
            startX -= spacing * (count - 1) / 2;
        }
        if(startX < viewRect.x) {
            startX = viewRect.x + 20;
        }
        for(var i = 0; i < this._racks.length; i++) {
            var x = startX + spacing * i;
            var y = viewRect.y + viewRect.height / 2 + this._rackHeight / 2 - this._racks[i].getHeight();
            if(y < viewRect.y) {
                y = viewRect.y + 10;
            }
            this._racks[i].setLocation(x, y);
        }
    }
},